
Developing OAuth applications
Instructions/guidelines on how to create an OAuth application that integrates with Transifex
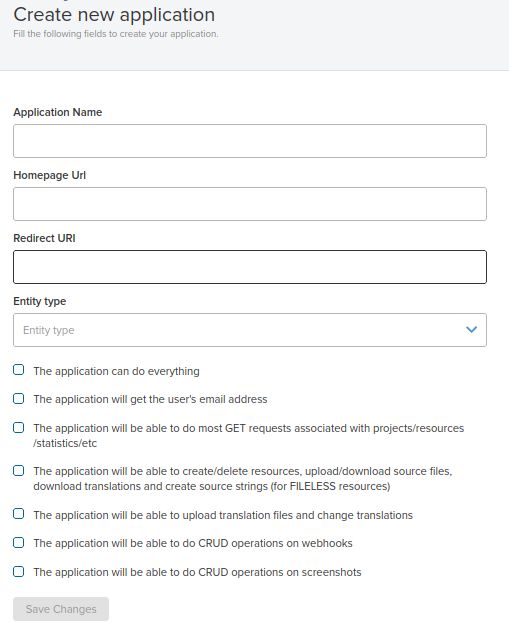
Registering the application
In order to create an OAuth App, you first have to contact us to enable this functionality for you; then, you can register an application. Go to https://app.transifex.com/<organization_slug>/settings/applications/ and click on "create new application". You will need to fill in the following fields:
| Name | The name of the application |
| Homepage URL | Where users can find your service and either start the authorization flow or manage their existing installation |
| Redirect URI | The URL of your service where users will be redirected to after they grant permission to the application |
| Entity type | Organization or Project. Whether instances of this application are meant to manage organizations or projects |
| Scopes | Which permissions instances of the application will have |
When you submit the form, take note of the client ID and client secret. The client secret in particular will never be shown again. If you lose it, it will have to be regenerated.
Scopes
The scopes you assign to your application will determine the kind of access installations of your application will have.
| * | The application will be able to do everything (only during development) |
| Whether the third-party service will receive the authorizing user’s email along with the token | |
| get_info | The application will be able to do most GET requests associated with projects/resources/statistics/etc |
| manage_content | The application will be able to create/delete resources, upload/download source files, download translations, create source strings (for FILELESS resources) etc. |
| translate | The application will be able to upload translation files and change translations |
| manage_webhooks | The application will be able to do CRUD operations on webhooks |
| manage_screenshots | The application will be able to do CRUD operations on screenshots |
Publishing the application
The application you registered will initially only be available to your organization. In order to make it available across Transifex, you will have to to contact support.
One strict prerequisite for your application to become public is to make sure the URL fields use the https protocol so that man-in-the-middle attacks cannot intercept the API token.
Users will be able to access OAuth applications in the following places in the Transifex UI:
- ‘organization settings → integrations’ for applications that have the organization entity type
- ‘project dashboard → settings → integrations’ for applications that have the project entity type
These pages are only available to organization administrators and project maintainers respectively.
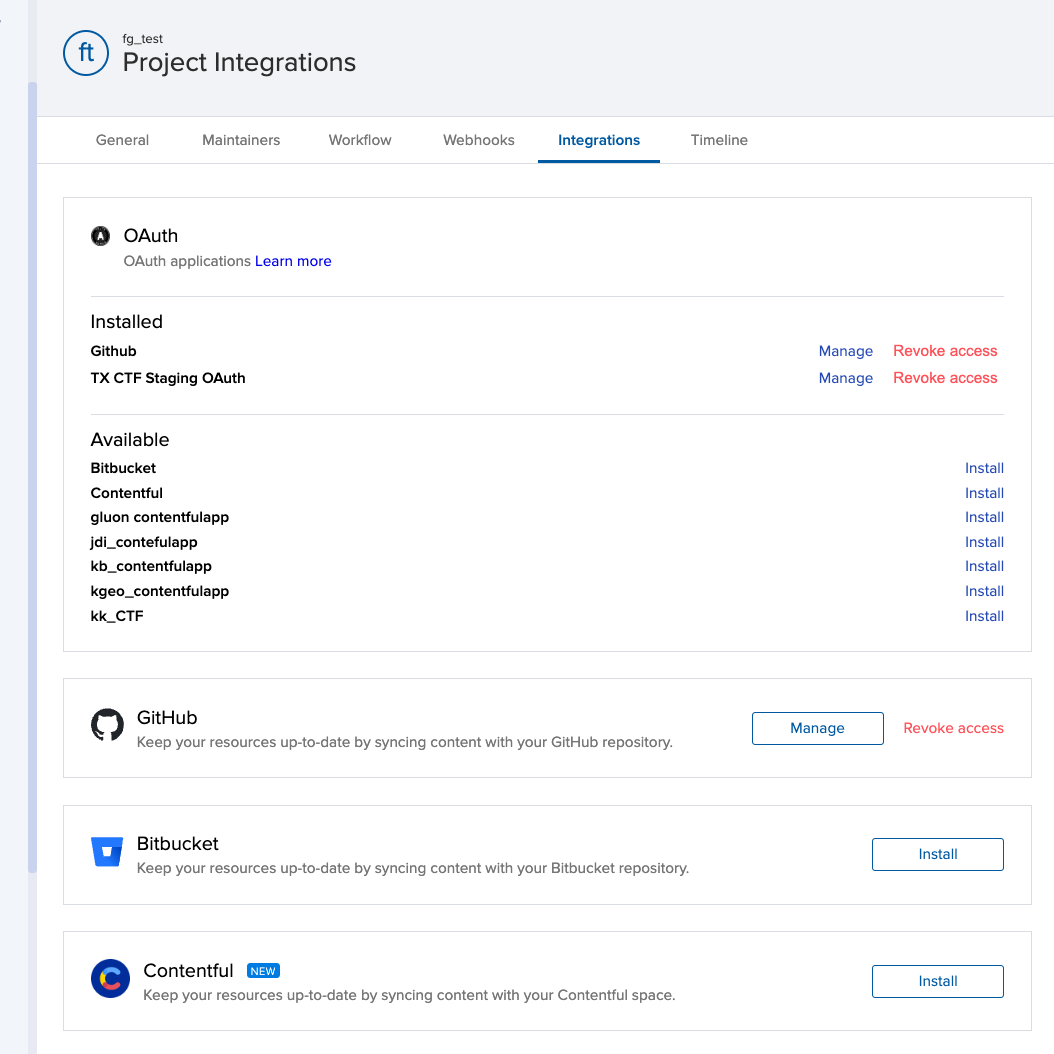
The applications that will be shown in this page are:
- Applications that are installed for the current organization/project
- Applications that were registered to the current organization
- Applications that are public
Installing the application - Authorization flow
Providing the authorization link
In your service, you must implement a link that will start the OAuth flow and prompt the user to give the necessary permissions for the application to be installed. The link must look like this:
https://app.transifex.com/-/oauth/auth/?
    response_type=code&
    client_id=XXX&
    state=XXX
Upon following the link, users will be asked to login to Transifex (if they haven’t already), select the organization/project the application will be installed on, review the scopes the application asks for and authorize or deny the application.
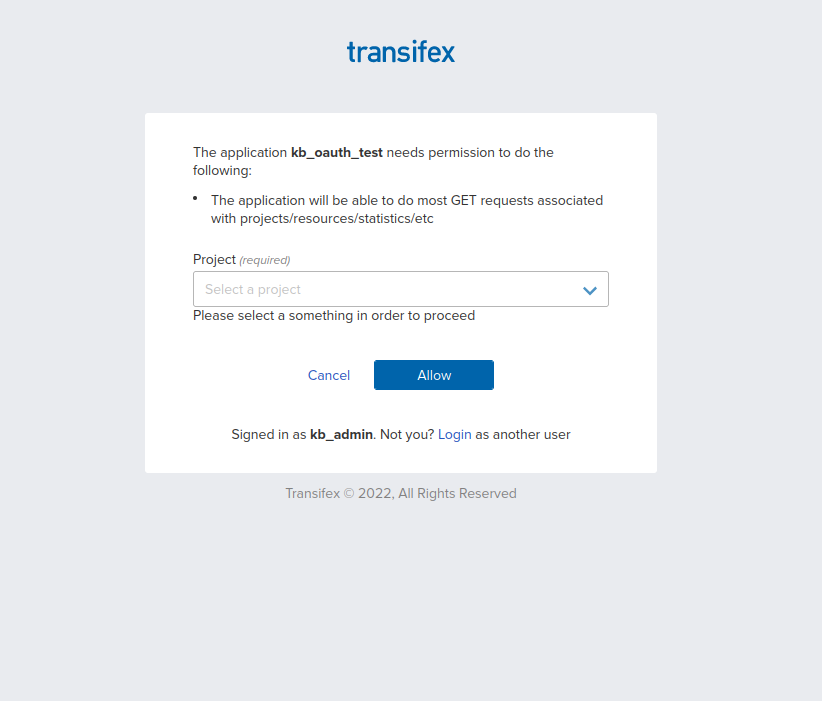
The GET variables on this link are as follows:
| response_type | This must always be code |
| client_id | The client ID of the application |
| state | This must be a random string your service will generate and store temporarily. When the user returns to your service (via the Redirect URL that was provided when the application was registered), this state will be supplied as a GET variable and you will be able to verify that the user started the OAuth flow from your service and not somewhere else. |
| (optional) | |
| organization_id | This is supposed to be an APIv3 Organization ID (for example o:myorg). If present, the Transifex page that will ask users to grant permission to the application will not ask the user to select which organization to install the application on, but the specified organization will be pre-selected. This option only makes sense if the application has the organization entity type. |
| project_id | This is supposed to be an APIv3 Project ID (for example o:myorg:p:myproject). If present, the Transifex page that will ask users to grant permission to the application will not ask the user to select which project to install the application on, but the specified project will be pre-selected. This option only makes sense if the application has the project entity type. |
In the application listing in the Transifex UI, the homepage link will lead users to your service (following the homepage URL that was provided when the application was registered). A transifex_organization_id or transifex_project_id will be included in these URLs as GET variables containing the APIv3 IDs for the current organization/project. Your service can take advantage of this by copy-pasting the IDs into the authorization links. This way, users that start the authorization flow from Transifex, will not have to re-select an organization or project in the authorization page.
For example, a service written in Python/Flask can do the following:
@app.route('/', methods=['GET'])
def index():
    if 'project_id' in session:  # If the user is "logged in"
        return redirect('/manage')
    else:
        url = '/install'
        if 'transifex_project_id' in request.args:
            url += f"?transifex_project_id={request.args['transifex_project_id']}"
        return redirect(url)

@app.route('/install', methods=['GET'])
def install():
    state = "".join((random.choice(string.ascii_lowercase) for _ in range(5)))
    session["state"] = state  # Remember this to verify the user later

    params = {"response_type": "code", "client_id": CLIENT_ID, "state": state}

    if "transifex_project_id" in request.args:
        params["project_id"] = request.args["transifex_project_id"]

    url = f"https://app.transifex.com/-/oauth/auth/?{urlencode(params)}"

    return f'<a href="{url}">Authorize Transifex</a>'
Bonus tip: You can set up your service so that if an
organization/project_idis present, instead of returning a 200 response with a page containing the authorization link, it returns a 302 redirect straight to the authorization page. This will save users an extra click and get them straight from the application listing to the authorization page with the organization/project pre-selected.
Handling errors during authorization
If something in the authorization link is incorrect, or if the user clicks on ‘deny’, the user will be redirected to the redirect URL that was provided when the application was registered. When they arrive at your service, the URL will also have the error and error_description GET variables. Possible error values are:
| unsupported_response_type | The response_type in the authorization link was not ‘code’ |
| invalid_request | Some other parameter in the authorization link was missing or was incorrect |
| access_denied | The user denied to authorize the application |
Getting an API token
When the user clicks on ‘Allow’, they will be redirected back to your service, following the redirect URL that was provided when the application was registered. When they arrive at your service, the URL will also have the following GET variables:
| code | A temporary code that your service will exchange an actual API token with |
| state | The same random string that was included in the original link that your service can use to verify the user |
Your service will need to make a POST request to <https://app.transifex.com/-/oauth/token/> with the following fields as form data:
| grant_type | This must be authorization_code |
| code | The temporary code that was included in the URL |
| client_id | The client ID |
| client_secret | The client secret |
If successful, Transifex will respond with a JSON response with the following fields:
| token_type | Will always be ‘OAuth' |
| access_token | The APIv3 token you can use for the needs of your integration |
| scope | The scopes assigned to this token |
| username | The username of the user that authorized the token |
| email (optional) | The email of the user that authorized the token. This only appears if the application has the ‘email’ scope |
| organization_id | An APIv3 organization ID (for example o:myorg) of the organization the application was installed on |
| unique_organization_id | A special kind of organization ID that will not change even if the organization’s slug changes in Transifex |
| (For applications with entity type: project) | |
| project_id | An APIv3 project ID (for example o:myorg:p:myproject) of the project the application was installed on. |
| unique_project_id | A special kind of project ID that will not change even if the project’s slug changes in Transifex |
If unsuccessful, Transifex will respond with a 400 JSON response with the errors field containing a list of error descriptions.
For example, a service written in Python/Flask can do the following:
@app.route("/callback", methods=["GET"])
def callback():
    state = request.args['state']
    assert state == session['state']  # Verify it's the same user
    code = request.args['code']

    response = requests.POST(
        "https://app.transifex.com/-/oauth/token/",
        data={'grant_type': "authorization_code",
              'code': code,
              'client_id': CLIENT_ID,
              'client_secret' CLIENT_SECRET},
    )
    response.raise_for_status()

    username = response.json()['username']
    project_id = response.json()['project_id']
    token = response.json()['access_token']

    _save_token_to_database(username, project_id, token)

    # Sign the user in
    session['username'] = username
    session['project_id'] = project_id

    return redirect('/manage')
Accessing the API
You can use the newly acquired API token to access the API in <https://rest.api.transifex.com>. In order for your service’s requests to go through, they must include the Authorization: OAuth XXX header.
username = session['username']
project_id = session['project_id']
token = _get_token_from_database(username, project_id)
response = requests.get(
    f"https://rest.api.transifex.com/projects/{project_id}",
    headers={'Authorization': f"OAuth {token}"},
)
Or, if you use the API SDK:
from transifex.api import TransifexApi
from transifex.api.jsonapi.auth import OAuthAuthentication

username = session['username']
project_id = session['project_id']
token = _get_token_from_database(username, project_id)
transifex_api = TransifexApi(auth=OAuthAuthenication(token))
project = transifex_api.Project.get(project_id)
Note: The Transifex API SDK supports a global object mode:
from transifex.api import transifex_api
transifex_api.setup(...)
and an instance mode:
from transifex.api import TransifexAPI
transifex_api = TransifexApi(...)
For server-side applications the instance mode is preferable because, if the server runs in a multi-threaded environment, configuring the global object in one thread will affect it in other threads.
About unique IDs
APIv3 IDs depend on project/organization slugs. Although not recommended, slugs in Transifex can change. For that reason, Transifex’s response during the token exchange also includes a “unique ID”. If you are worried about slug changes, you should associate the session with that unique ID. You can then use the API to retrieve a proper APIv3 ID for your application:
username = session['username']
unique_project_id = session['unique_project_id']
token = _get_token_from_database(username, unique_project_id)
transifex_api = TransifexApi(auth=OAuthAuthenication(token))

unique_identifier = transifex_api.UniqueIdentifier.get(unique_project_id)
project_id = unique_identifier.resource_id

project = transifex_api.Project.get(project_id)
Accessing the API in front-end code
If you want to give your front-end access to the API, you cannot simply forward the token to the browser, since users would then be able to intercept it. Instead, you can write a proxy view in your service. For example, a service written in Python/Flask can do the following:
@app.route("/txapi/<path:path>")
def txapi(path):
    token = _get_token_from_database(session['username'], session['project_id'])
    url = f"https://rest.api.transifex.com/{path}"
    headers = {
        key: value for key, value in dict(request.headers).items() if key != "Host"
    }
    headers["Authorization"] = f"OAuth {token}"
    files = {
        name: (file.filename, file.stream)
        for name, file in dict(request.files).items()
    }
    response = requests.request(request.method,
                                url,
                                params=dict(request.args),
                                data=request.get_data(),
                                files=files,
                                headers=headers)
    return response.content, response.status_code, dict(response.headers)
After that, the front-end code can treat the /txapi URL as the base of the Transifex API:
@app.route("/resources", methods=['GET'])
def resources():
return render_template("resources.html", project_id=session['project_id'])<!-- resources.html -->
<html>
<body>
<script src="https://cdn.jsdelivr.net/npm/@transifex/[email protected]/dist/browser.transifexApi.min.js"></script>
<script>
const projectId = '{{ project_id }}';
const transifexApi = window.transifexApi.transifexApi;
transifexApi.setup({ host: '/txapi', auth: () => { return {}; } });
async function main() {
const project = await transifexApi.Project.get(projectId);
const resources = transifexApi.Resource.filter({ project });
await resources.fetch();
console.log(resources.data);
};
main();
</script>
</body>
</html>Managing logins
Most OAuth applications don't implement a login system, instead they rely on the ΟΑuth flow to grant access to users. It is highly likely that this will be the case for your application too. If that is the case, when a user's browser session expires or when they try to access the integration from a different browser, your application will not be able to recognize them. Instead it will prompt them to go through the OAuth flow again, as if they were brand new users. At the end of the flow, a new token will be generated and sent to the callback URL in your application along with the username and the organization or project ID. It is your responsibility to recognize that this is the same user as before, delete their previous token and save the new one:
@app.route("/callback", methods=["GET"])
def callback():
    state = request.args['state']
    assert state = session['state']  # Verify it's the same user
    code = request.args['code']

    response = requests.POST(
        "https://app.transifex.com/-/oauth/token/",
        data={'grant_type': "authorization_code",
              'code': code,
              'client_id': CLIENT_ID,
              'client_secret' CLIENT_SECRET},
    )
    response.raise_for_status()

    username = response.json()['username']
    project_id = response.json()['project_id']
    token = response.json()['access_token']

    if _token_in_database(username, project_id):
        # We have seen this user before
        _delete_token_from_database(username, project_id)

    _save_token_to_database(username, project_id, token)

    # Sign the user in
    session['username'] = username
    session['project_id'] = project_id

    return redirect('/manage')
Transifex can authorize API requests made with the last 10 OAuth tokens that have been generated for a particular user and organization/project. Thus, if a user goes through the OAuth flow and generates a new token while a background task that uses an old token runs on your application, the task's requests will manage to go through. However, if you never replace old tokens with new ones every time the user goes through the OAuth flow, your application's requests will eventually start getting rejected.
Revoking access
In the Transifex UI, in the application listing, a 'Revoke access’ button will be present for already installed applications. This button will revoke the token issued for this installation, making it invalid. Your service must be prepared for the eventuality that one of its stored tokens becomes invalid and starts getting 401 responses from the Transifex API. For example, a service written in Python/Flask can do the following:
from transifex.api import TransifexApi
from transifex.api.jsonapi import JsonApiException
from transifex.api.jsonapi.auth import OAuthAuthentication

@app.route('/manage', methods=['GET'])
def manage():
    username = session['username']
    project_id = session['project_id']
    token = _get_token_from_database(username, project_id)
    transifex_api = TransifexApi(auth=OAuthAuthentication(token))
    try:
        project = transifex_api.Project.get(project_id)
    except JsonApiException.get(401):
        flash("Your token has become invalid, please re-authorize")
        return redirect(f'/install?transifex_project_id={project_id}')

    # Do other things with the API and return something
A safer alternative is to start the revocation process from the integration service itself. A <https://app.transifex.com/-/oauth/revoke_token/> URL is available that accepts a POST request with the following fields:
| client_id | The client ID |
| client_secret | The client secret |
| token | The token to be revoked |
After a successful token revocation, Transifex will return a 200 response. Then your service can delete any data it has stored that is associated with this token. For example, a service written in Python/Flask can do the following:
@app.route('/revoke', methods=['POST'])
def revoke():
    token = _get_token_from_database(session['username'], session['project_id'])
    response = requests.POST(
        "https://www.transifex.com/-/oauth/revoke_token/",
        {'client_id': CLIENT_ID,
         'client_secret': CLIENT_SECRET,
         'token': token},
    )
    response.raise_for_status()
    _delete_token_from_database(session['username'], session['project_id'])
    # Delete any data associated with the token
    return redirect('/')
Keep in mind that if multiple users authorized the application for the same project, this action will only revoke one user’s token. This may be what you want, but if you want to delete everything associated with the whole project, you will have to do this for every token for this project:
for token in _get_all_project_tokens_from_database(session['project_id']):
    response = requests.POST(
        "https://www.transifex.com/-/oauth/revoke_token/",
        {'client_id': CLIENT_ID,
         'client_secret': CLIENT_SECRET,
         'token': token},
    )
    response.raise_for_status()
_delete_all_project_tokens_from_database(session['project_id'])
# Delete any data associated with the project
Updated 10 months ago